
Mostrando entradas con la etiqueta Primavera. Mostrar todas las entradas
Mostrando entradas con la etiqueta Primavera. Mostrar todas las entradas
domingo, 7 de abril de 2013
Manualidades de primavera
Os dejo el enlace de este libro en Picasa para seguir con las actividades de primavera, con materiales sencillos y muchos de ellos reciclados. Que lo disfrutéis :)


domingo, 3 de marzo de 2013
Guirnaldas con blondas de papel
Aunque aún no lo veamos claro, la primavera está a un
paso. Para preparar la decoración de Spring o bien de
una fiesta de cumpleaños, puede ser útil esta idea para
hacer estas guirnaldas de colores realizadas con blondas
de papel.
Fácil, sencillo y barato. Es una idea que hemos visto en el
blog Ucreateparties, donde encontaréis el tutorial paso a
paso para hacer las guirnaldas. La idea es una creación
de Lisa Storms, cuyo blog esta repleto de ideas sencillas
y geniales.
Y este es el magnífico resultado:


paso. Para preparar la decoración de Spring o bien de
una fiesta de cumpleaños, puede ser útil esta idea para
hacer estas guirnaldas de colores realizadas con blondas
de papel.
Fácil, sencillo y barato. Es una idea que hemos visto en el
blog Ucreateparties, donde encontaréis el tutorial paso a
paso para hacer las guirnaldas. La idea es una creación
de Lisa Storms, cuyo blog esta repleto de ideas sencillas
y geniales.
Necesitaréis: blondas de papel de diferentes tamaños
que podéis encontrar en cualquier supermercado.
Colorante alimentario , pegamento y hilo de pescar
para colgar las guirnaldas. Para cada guirnalda
se necesitan aproximadamente 8 blondas.
que podéis encontrar en cualquier supermercado.
Colorante alimentario , pegamento y hilo de pescar
para colgar las guirnaldas. Para cada guirnalda
se necesitan aproximadamente 8 blondas.


sábado, 1 de diciembre de 2012
El próximo experimento de Science que realizaré en clase :)

We are goint to use CD cases! In this class, they've we used potting soil to plant their beans.
Day One:

Watering the bean:

Watching it grow!

Measuring its growth:

Recording observations:

Labeling the parts of the plant:


Tips:
- The hinges of the CD case should be at the top. That way you can stand them up and dirt won’t fall out. Also this leaves a nice hole at the top for watering the plants with droppers.
- Plant your bean high in the soil. If you plant it toward the bottom the roots will grow out the bottom!
- Tape the bottom shut. This will keep roots from growing out the bottom, and curious fingers from opening the case.
- Use masking tape and permanent markers to label whose plant is whose.
- Around day 5 or so I untaped the cases overnight so that they could have a little bit of space to grow. I taped them back in the morning. By day 7 or so, you will be ready to label your plants. We used paint pens.
- Plant your bean with the concave side down. It should resemble the letter “n,” not the letter “u.” I didn’t tell my kids this. I just let them discover it… which was a nice learning experience. Just depends on which way you’d rather teach it.
Fuente: the green classroom
lunes, 30 de mayo de 2011

jueves, 7 de abril de 2011
En Abril aguas mil: Celebrate April Showers with a Rain Stick Craft

To make a rainstick, you will need:
- An empty paper towel roll
- Left over tissue paper
- Scissors
- White glue
- Paint brush
- Rubber bands
- Wax paper
- Aluminum foil
- Rice/Popcorn kernels (if I made another one, I would just stick with the rice because I think it sounds more like rain)


Start with a sheet of aluminum foil about 25" long.

Roll the aluminum foil into a long tube to make the interior of the rainstick craft. I wrapped ours around a dowel.

Curl the foil into a spring. Again, I used the dowel.

You'll want the final coil to be just about the length of your paper towel roll. It then gets placed inside the rainstick.

Wrap wax paper around one end of your rainstick craft, and affix it with a rubber band. I then cut off the excess.

Have your kiddo help you pour in rice, popcorn kernels, or whatever you've decided to use to make your sound effects.

Seal up the other end of your rainstick craft with wax paper and a rubber band.

Cut your tissue paper into small pieces (about an inch or so). We recycled tissue from presents we've received.

Mix white glue with a little water and use your paint brush to decoupage the tissue paper on to your rainstick.
I decoupaged the tissue paper right over the wax paper to make it less likely to come loose and fall off.
What I Learned the Hard Way: I originally had cut out wax paper circles to put over the ends, but I found them really hard to work with, so I ended up just using a bigger chunk of wax paper and cutting it after I put the rubber band on. Also, the popcorn doesn’t sound nearly as good as the rice.
Fuente. Craft jr
domingo, 27 de marzo de 2011
Daffodil windmills, manualidades de primavera

You’ll need: yellow card (or card and yellow paint), green card, a egg box, a paper fastener, yellow and/or orange paint, a small paint brush, a stapler, a ruler, a pencil, a pair of scissors, (a craft knife – optional) Start by cutting a square from your yellow card. We only had white card in the house, but as Little is painting-crazy at the moment this wasn’t a problem as we did have some yellow paint. If you are going to paint you will need to paint both sides of the card.

Cut out the cup part of the egg box – this is going to be the trumpet part of your daffodil. Paint it either yellow or orange, depending on what colour you would like in the centre of your flower.

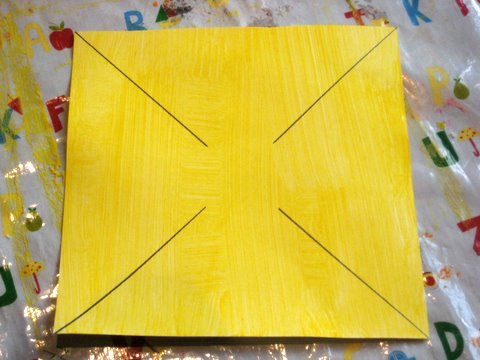
Once any paint is dry you need to cut lines into the yellow square of card as shown in the photo below. You can draw the lines using the pencil and ruler and then cut along them with the scissors.
 Now you need to fold in four of the edges, as shown below. Fasten them in place with a stapler.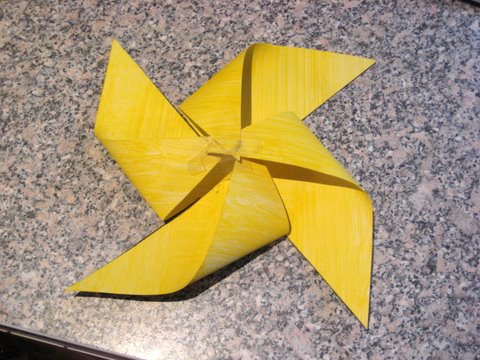
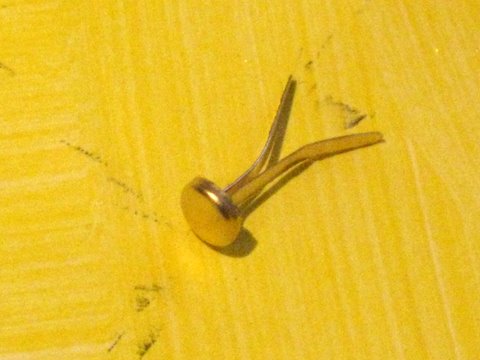
Make a stalk for the flower by rolling a piece of the green card in to a tube. Now you’re going to use the paper fastener to join the egg box trumpet, the daffodil and the stalk all together. You can poke the paper fastener straight through the card but you might find it easier to make a hole with either the pencil or craft knife first. You want the hole to be loose enough for the daffodil to twirl around to give you the windmill effect.
 And there you have it – a beautiful daffodil. You could make a few of them in different shades to make a lovely spring bouquet.
fuente: naturestore.co.uk
sábado, 26 de marzo de 2011
viernes, 25 de marzo de 2011
Actividades para infantil en inglés sobre la primavera (spring activities for kids)
Spring printable activities and worksheets suitable for toddlers, preschool, kindergarten and early elementary.

miércoles, 23 de marzo de 2011
Easy Flower Cake

What You Need to Make This Easy Flower Cake

Flower Cake Pans
A standard round cake pan
Heart mold pan (this one is silicone)
Cake mix or a killer cake recipe
Store bought frosting or a to die for frosting recipe (I kid you not – this frosting is TO. DIE. FOR.)
Colored sugar (or make your own with sugar and food coloring (instructions below), or colored frosting)
Zippered plastic bags to make colored sugar, or to use instead of a pastry bag.
Optional - shallow 3″ round cake mold for leaves (you can also just halve a heart cupcake for the same effect)
Optional - pastry bag
How to Make this Flower Cake
Simply mix up your cake batter, and cook it in the following molds:
1 round cake form.
12 heart cupcakes, filled low so that they don’t lose their shape and pop over the top of the pan.
2 shallow round cakes, or two more heart cupcakes, cut in half to make 4 leaves.
You should have enough with one cake mix. But I used both chocolate and vanilla cake for mine, because a large family is hard to please with one flavor!
Once complete, your cooked cake pieces should look like this:

Unfrosted Flower Cake
I then frosted only the tops of the cake pieces. For the yellow center, you could use yellow frosting, or I frosted mine with regular white frosting, then dusted it heavily with colored yellow sugar. Do this before you put the leaves and petals on the plate.
How to Make Colored Sugar
This is so easy you probably don’t need directions. Put about a cup of sugar into a zippered plastic bag, and add a few drops of food coloring. Give it to the kids to play with as they mix the coloring with the sugar. Add different colors mixed together to get various shades of yellow and green, or whatever color you want to make! Add more food coloring as necessary to get your desired color saturation.
WARNING: Even if you put a whole bottle of red food coloring into the bag, it will not be as red as the colored sugar you can buy in the store.
Yes, I found that one out the hard way.

Flower Cake Assembly
To make the flower cake leaves, frost the tops of your half rounds, or half hearts. Then dip the tops into colored sugar. Again, you could just use green frosting for this part as well. I just had the colored sugar leftover from Christmas and really needed a reason to use it up!
Put the heart petal shapes around the cake before you frost them.
To pipe the frosting onto the flower petals, you could use a pastry bag with a fluted tip. I couldn’t find mine and was in a HUGE rush to finish. So I just used a zippered plastic bag with the corner cut off.
WARNING: DO NOT use cheap zipper bags for this. They pop open. The good news is that if this happens, it’s fairly easy to dump the frosting into another bag. And then pray that one doesn’t break, either.
Yes, I found that one out the hard way, too.
Fuente: woo jr.
lunes, 21 de marzo de 2011


Yo colaboro con Apadat, ¿y tú?

Ellos lo merecen
I just made a new Voki. See it here:

Contador de visitas

Useful links
-
-
-
-
PROGRAMA MIRA.Hace 13 años
-
Una sorpresa muy agradable...Hace 14 años


About Me

Feedjit

